

How To Draw A Girl With Curly Hair
If the thought of drawing hair overwhelms you - you're not alone. It's easy to see all of the details and textures within hair and assume that information technology must be difficult to capture it all in a drawing. But information technology doesn't have to exist overwhelming and we tin simplify the procedure, making drawing pilus a fleck more manageable.
In this lesson, nosotros'll take a look at how to draw pilus and I'll share with you a unproblematic step by step approach of ascertainment and awarding of media that can be practical to any type of hair.
We'll outset look at an easy to follow method that is cleaved downwardly into iv distinct processes...
Drawing Pilus - The Iv-Stride Arroyo
I may exist defining this process as a four-step approach, still it's more like a three-step arroyo. The third and quaternary steps are combined and are executed at the same fourth dimension. Earlier nosotros begin the process of drawing the hair, nosotros need to be sure that the structure of the caput is fatigued in place. The structure of the head dictates the shape and menses of the hair and should exist divers before we brainstorm drawing the hair.
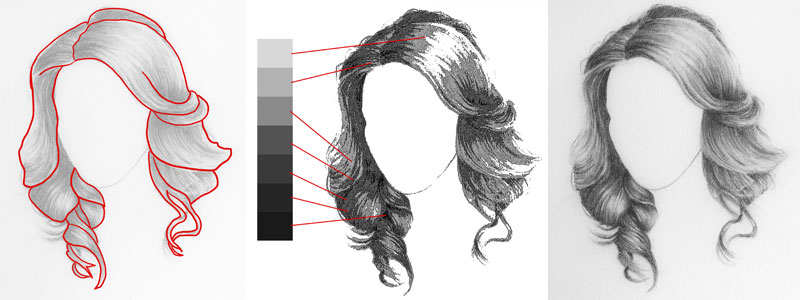
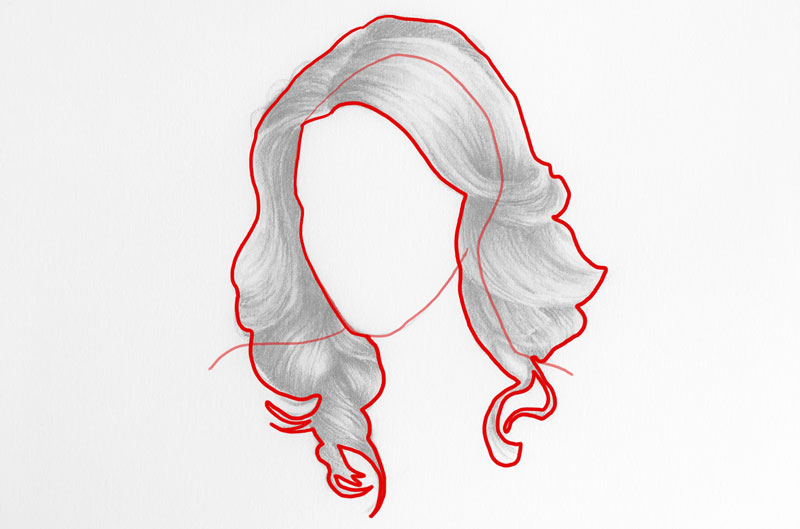
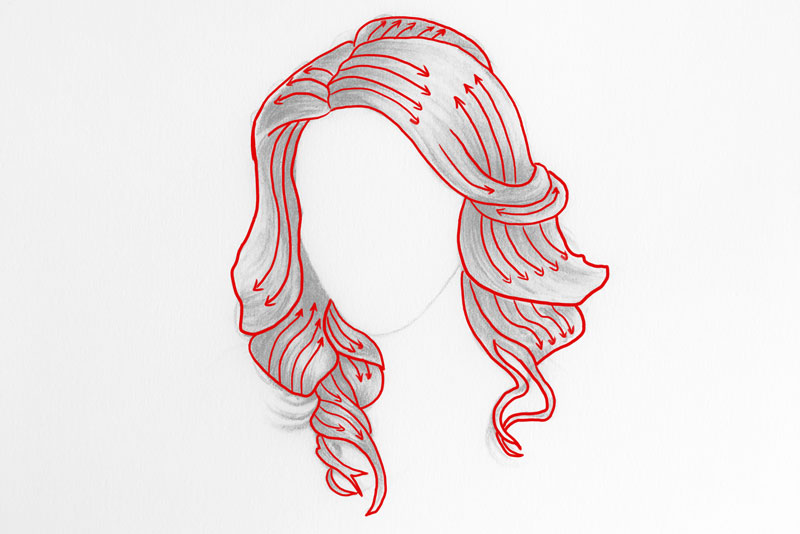
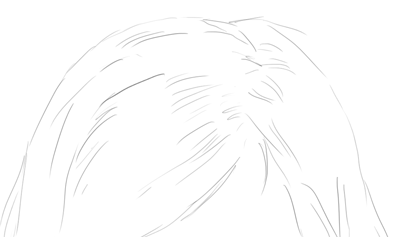
Stride I - Define the Outer Contour of the Hair
Assuming that the structure of the head is in place, the showtime step is to define the outer contour or outline of the hair. This includes the lines that are formed as the pilus overlaps the forehead, portions of the confront, and the shoulders. In many cases, the hair lifts off of the attic and may overlap much of the face. Of course, every head of hair is different and the contours that are drawn at this stage will be different for every field of study.
Tip: The medium that yous use volition influence how you approach drawing the hair. In this lesson, graphite pencils are used. For example, if you are drawing hair with pastels, you may choose to fill in the shape of the hair with solid color and skip drawing the contours.
Nosotros'll draw the contour lines lightly and loosely with a harder and lighter, 2H pencil. Nosotros're careful not to place likewise much force per unit area on this harder pencil as this tin can atomic number 82 to indenting in the surface of the paper.
Footstep Two - Describe Shapes For The "Clumps" of Pilus
As we draw the profile lines, defining the overall shape of the hair, we'll too draw smaller shapes for clumps of hair. Pilus strands naturally collect and create a form (which is what I am referring to as a "dodder").
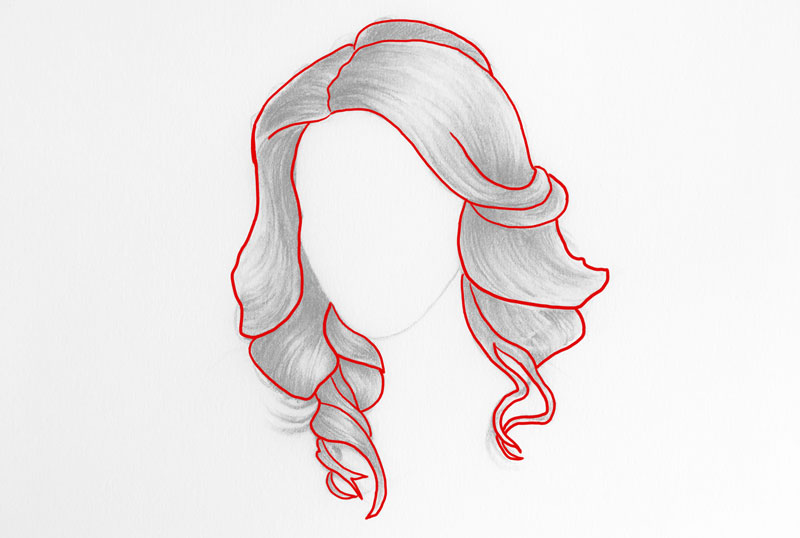
Information technology clearly doesn't make sense to draw every strand of pilus. Not simply would this take an incredible amount of fourth dimension to achieve, just information technology also would pb to very unnatural looking pilus. Instead, we demand to consider the hair as a form. We'll define the book of these forms in the side by side step, but for now we'll concentrate on defining the shapes.
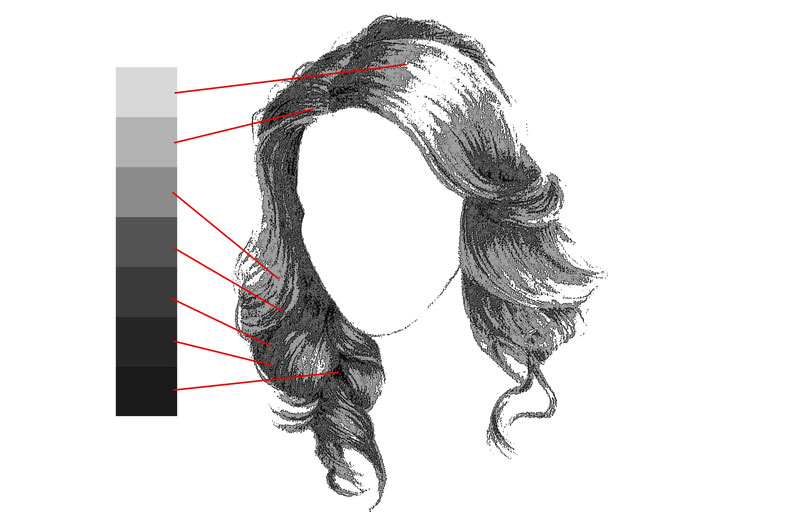
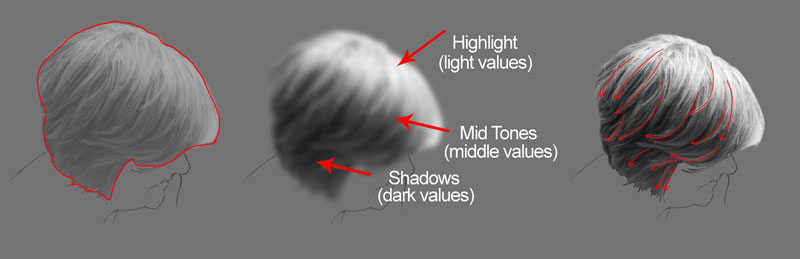
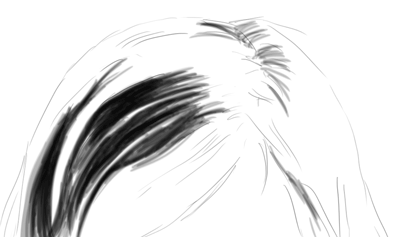
Step Three - Developing the Volume Through Value
We understand forms considering of the mode in which lite interacts and behaves on them. We understand light through the use of value. Therefore, nosotros understand forms in a drawing through the employ of value. Value is the darkness or lightness of a colour. The placement of dark and light values on a subject inform us of the intensity of light and the nature of the grade.
We must consider the values and tones that are observed within the hair and include them in our drawing in gild to communicate the volume of the hair. In virtually cases, a full range of value is present. This means that we're likely to find the darkest darks, the lightest lights, and the centre values all inside a head of hair.
Because of the nature of light, we can assume a few things...
- Locations that recede will be darker in value.
- Locations that protrude will be lighter in value.
- No matter what the "color" of the pilus, at that place will still be low-cal and dark values.
Nosotros know that locations inside the pilus that are closer to the light source or extend out from the caput are likely to "catch" more than calorie-free. Naturally, this results in an area of lighter value.
We besides know that areas that recede or are blocked from receiving low-cal should be darker in value.
All hair colors will feature a full range of value. Blonds have locations of darker tone in their hair, and people that have black hair have areas that are almost white (highlights).
If we keep these things in mind, then nosotros tin can assume that (in most cases) the parts of the hair and the areas effectually the face up will be darker in value since these areas recede. We also know that highlights are most likely to exist found on the superlative of the head, closest to a light source above.
To command the value fully, nosotros'll beginning with a harder 2H pencil and develop the locations of darkest value, the mid tones, and the locations of lite value. We'll do our best to preserve the areas of strongest highlight, allowing the white of the paper to exercise the work for united states of america.
Afterward the harder and lighter pencil is applied, we'll progress to a darker and softer one - addressing the areas of darkest value and tone. Every bit we develop the value range and create the illusion of form, we'll too consider the texture.
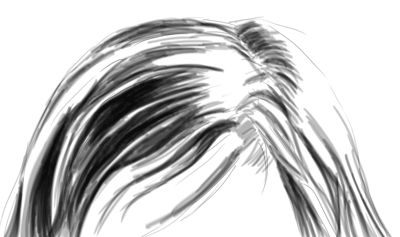
Step Four - Draw the Texture of the Hair
(The texture of the hair is actually divers as the value is developed. So, the 3rd and quaternary steps of this process are addressed meantime.)
Texture, like grade, is too defined largely through the use of value. Light values and nighttime values work together to inform united states of the texture of the subject field. Loftier dissimilarity between values with trivial transition or gradation frequently leads to the illusion of coarse texture.
Smooth transitions betwixt values with fifty-fifty gradations often leads to the illusion of a smoother surface texture.
But there is more to texture than the relationships of tone and value. The surface of the paper, the medium used, and the manner in which it is applied are all contributing factors as to how the texture of the subject area may exist perceived by the viewer.
Hair is soft, just in that location should be some indication of linear texture. To create the impression of linear texture, nosotros'll apply the medium using directional strokes that flow over the form of each "clump" of hair. These lines are sometimes referred to as cross contour lines.
For each layer of graphite that we apply, we'll apply a blending stump to work the medium into the molar or texture of the paper. This will help to create the impression of softness and smoothen any inconsistencies produced by the softer graphite applications.
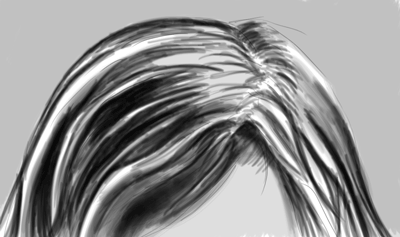
Any locations within the hair that demand to be lighter can be rendered using an eraser. An eraser pencil or eraser pen works best at lifting the graphite in these areas. Strands of lighter hair tin be developed using the eraser as well.
To finish up, we'll add together a few devious hairs that extend from the body of the hair. These stray hairs can exist made with quick deliberate marks with a sharpened HB pencil.
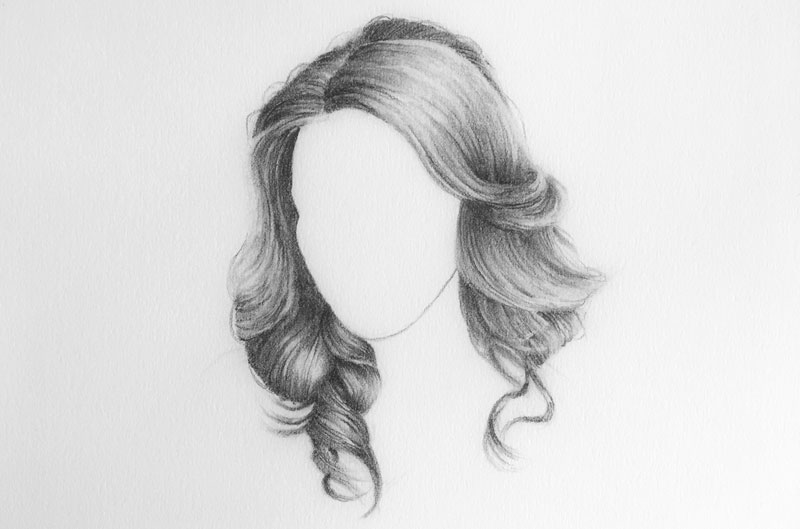
Hair is complex and is therefore circuitous to draw. Only by breaking down the steps, we tin simplify the procedure a scrap. If you know how to encounter pilus in terms of shapes, lines, and values then it becomes just like drawing annihilation else.
Drawing a Strand of Hair
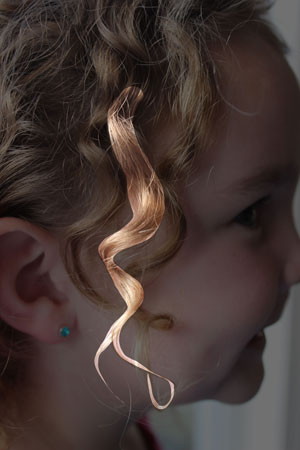
As is the case with any subject that yous draw, practice is important. The more that we practice with a detail subject, the ameliorate we empathise it. Drawing a whole caput of pilus will give you lots of exercise. However for some, the thought of doing this may be intimidating. Instead, it may be better to tackle a portion of the hair first. In this case, a unmarried strand of hair will do.
You may first past taking a photo of someone's hair - maybe your ain. Endeavor to isolate one portion of the hair. Await for a defined drove hair that forms a shape.
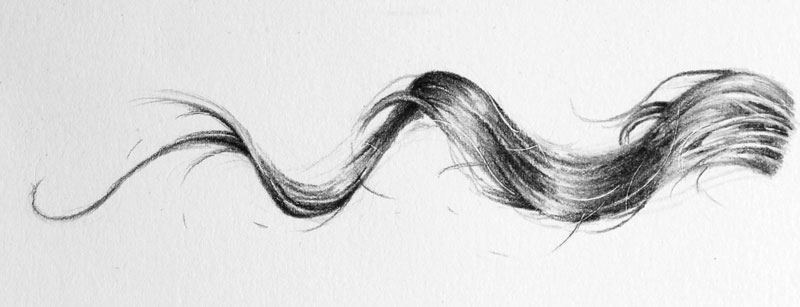
The four step approach that we explored above can besides exist used for a single lock of hair...
- Kickoff by defining the shape with low-cal, loose lines.
- Interruption the shape of the lock of pilus down into simpler shapes.
- Look for the ascendant shapes of light, dark, and center values.
- Develop the texture and the value with directional strokes.
Drawing Directly Hair
In both of our first ii examples, we saw how to describe pilus that is wavy. But non everyone has wavy hair. And then how is this process different if the hair is straight?
Well, information technology'due south not that different. In fact, we'll use the same arroyo to draw pilus of any style. The simply exception with directly pilus is that we're likely to see less dramatic changes in value. Nosotros'll still see contrast betwixt darks and lights, simply this will happen from layering instead of inside each "clump" of pilus.
So again, we'll first define the outer contour of the shape of the hair. And again, we can simplify this further into smaller shapes that draw the clumps.
From here, we can look for the relationships of values. It may help to squint at your subject area. Doing this may brand the shapes of lighter and darker value stand up out a flake more than.
And so nosotros'll apply directional stroking to develop the texture and the range of value.
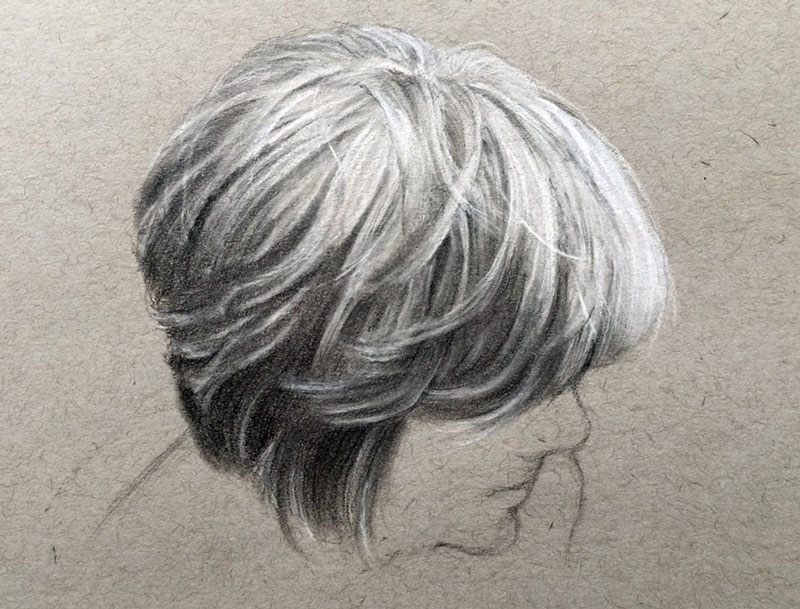
In the example below, a combination of graphite and white charcoal is used to develop the cartoon. The cartoon is completed on toned paper which makes the white charcoal applications stand out. The image below is from Portrait Drawing The Smart Way.

How to Depict Curly Hair
Only what about curly pilus? Shouldn't this type of hair be dissimilar?
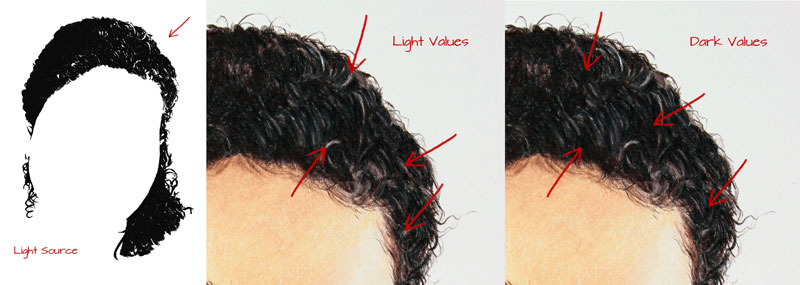
Well, the results may be unlike, but the thought process is the same. We'll still need to start with the overall shape of the hair. Curly hair tends to have more than devious hairs that find their fashion outside the confines of the general shape. For this reason, we'll concentrate on drawing the shape without all of the stray hairs. These devious hairs tin can be added afterward the full general shape has been drawn, just more on this in a moment.
After the general shape has been defined, nosotros'll consider the light source. In this instance, the calorie-free source originates from the upper correct corner. This produces highlights on the upper correct portion of the head. Even though nosotros have light areas hither, nosotros'll yet see some dark values as well. This is true even if the hair is light in color.
Once nosotros take a good understanding of the light, nosotros can begin developing the texture and value of the hair. The directional strokes that are used should menses along the form of each drove of hairs. With curly hair, the collections are smaller and more than compact. Since the hair is curly, the directional strokes that we brand for each "clump" should also curve just every bit the hair does.
Once we have the main body of the hair developed, we tin go back and add those stray hairs. Doing this adds to the realism. Deliberate and confident marks work best for devious hairs. It doesn't accept to exist an exact re-create of the field of study, so don't put too much pressure on yourself to make it perfect.
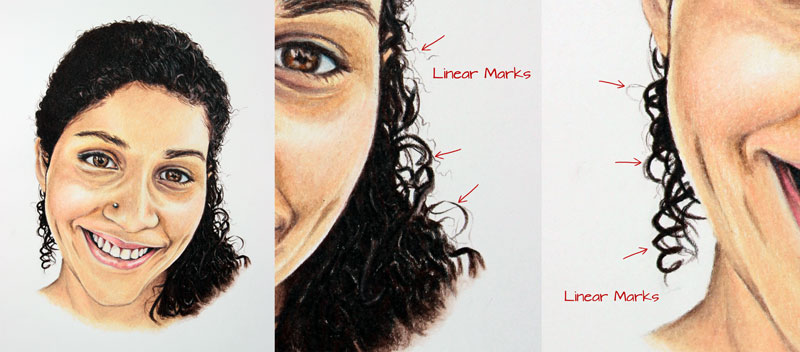
Below you'll encounter the finished portrait drawing from The Colored Pencil Course along with close ups of the marks used for devious hairs.
Dissimilar Approaches
There is no true formula for cartoon hair. Every head of pilus is unique and similar many aspects of figure drawing, changes in viewpoint can dramatically affect the approach that you lot take. Light reflects off of hair differently and textures are diverse.
Ascertainment is always paramount to your success no matter what approach you lot accept or method you choose to use. There are always multiple "rights" and dissimilar ways of seeing.
Another Instance - Stride by Step
Begin by drawing the outline of the outside of the pilus. Notice the nighttime areas and the lite areas in the pilus. Try to map out these areas as shapes. Don't endeavour to draw every strand of hair. Instead, concentrate merely on shapes and the value inside them.
Next, begin to add value to the darker shapes get-go. Y'all'll desire to build upwardly the value slowly. Be careful not to get as well dark likewise quickly. Once again, don't retrieve about hair - call back shapes, values, and lines.
Proceed darkening upward the shapes and lines that you see. When you add directional lines in the hair, make sure that they flow in the direction that the hair grows.
Contrast is important. Be sure to have a background value in listen. This will make your hair stand out.
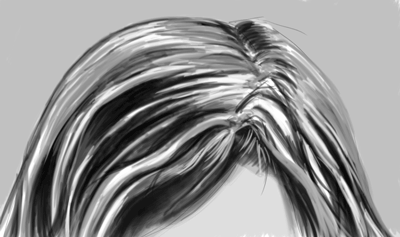
Don't be afraid to work the values to increase the contrast. Adjust darker tones by adding additional applications of graphite and make areas lighter with your eraser.
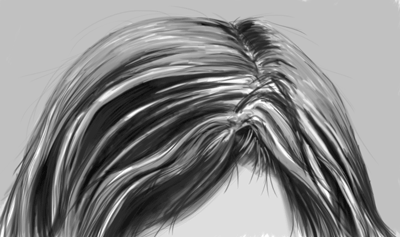
Be patient and sympathise that cartoon hair is irksome process. Take your time and allow the drawing to develop gradually.
More Lessons You lot'll Love...

Source: https://thevirtualinstructor.com/how-to-draw-hair.html
Posted by: kennedyuted1981.blogspot.com
0 Response to "How To Draw A Girl With Curly Hair"
Post a Comment